Wednesday, September 18, 2013

Comfort Food

Hello everyone,

Wow it has been way to long since I last posted on here. Life for me has been so busy with the Equestrian Team season, school started, work continued, and my wedding is now only 24 days away. In the midst of all the chaos the cooler weather of fall has arrived!!! Which means I am making comfort foods and also means Tony is Happy, Happy, Happy!!!

So last winter after Tony had bought our home I wanted to have a nice dinner for my mother, father, sister (who was in from Cali), and my stepmother. So what better dinner to make right after Christmas than a pot roast! Well we ended up with pizza... Ooops

I found a recipe online that had great reviews so followed it to a tee, which I usually don't do. When I pulled open the lid it smelled and looked oh so very very good. EEEEEEHHHhhh wrong! The meat was still very hard and chewy :( therefore I just ordered pizza because that is always my go to meal!

This time was a totally different story! The pot roast I made was oh so so so flavorful and tender and just very very yummy. Kraft has these new items called Recipe Makers which pretty much does everything for your minus the cooking but that is what the crockpot is for! I used the New England Pot Roast Recipe Maker and all the directions are spelled out for you on the box.

Ingredients

1 boneless beef chuck roast (2-1/2 lb.)
1lb. small red potatoes, quartered
1lb. baby carrots
1 onion, cut into wedges
1 pkg.  (16.6 oz.) KRAFT RECIPE MAKERS New England Pot Roast

First cut your red potatoes in halves or quarters depending on the size you buy and cut your onion. Then put your hunk of meat in your crock pot top with the onion, potatoes, and carrots.

Top all of that with the first sauce from your Recipe Makers box, Simmer Sauce.

Cook on low for 8-10 hours


Once it has finished add in the Finishing Sauce and set on high to cook for 15 minutes.


And boom you are done! Super easy right? Below you will see the plate I made for myself. I made some yeast rolls topped with Italian seasoning and parmesan cheese with a side of cottage cheese. This was just what the doctor order to warm my belly after a day that barely made it to 60, bring on the snow!

Until next time (hopefully not two months from now),
Olivia


Wednesday, August 7, 2013

Chicken Stuff

So yesterday I took the day off from life. I was not feeling well at all so I decided to have a "I'm not getting out of my pajamas day." Not only was it one of those days but it was also cloudy with a nice chill in the wind. When you add up all of those conditions you get........ Comfort Food Day!!!

I did not feel like making anything that did not require my crockpot so I made, as Tony likes to call it, Chicken Stuff. This is by far one of the easiest dinners you will ever make and oh so yummy.

What you'll need
Two or three chicken breast
Two packets of chicken gravy
Two cans of chicken broth or water
2 tbs. Chicken bouillon
2 tbs. Garlic Powder
1 tbs. Onion Powder
1 tbs. Paprika
Mashed Potatoes or Rice

Directions
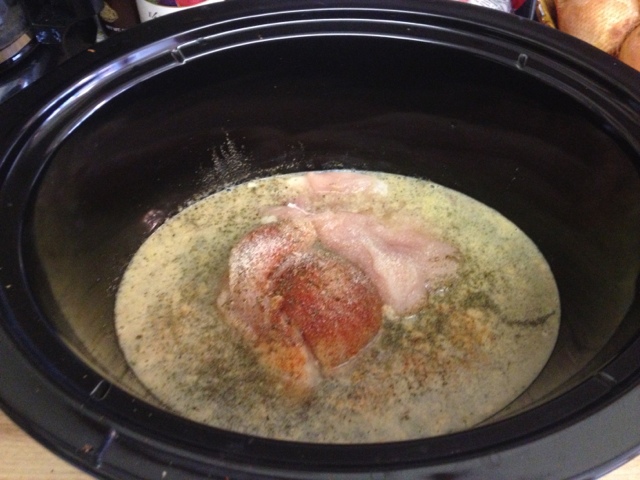
Take your two chicken breast and place them in your crock pot

Add your two cans of chicken broth or two cups of water

Add you seasonings into the crock pot, if you are using water you will need to add extra chicken bouillon

Cook on high for 6 hours


When the chicken is almost done start your potatoes to make mashed potatoes or you can use the instant mashed potatoes.

After cooking for 6 hours your chicken will be nice a tender. Take it out and shred it up.

Cook your two packets of gravy by following the directions on the back of the package.

Once gravy is done mix together both gravy and shredded chicken.


Now take a nice helping of your mashed potatoes and top it with your chicken.

I served this with some yummy steamed broccoli and cauliflower.

Enjoy!


Until next time,
Olivia

Monday, August 5, 2013

Cake Stands

So my wedding is only 68 days away!!! Oh how I can't wait to walk down the aisle and vow to the love of my life that I will be his forever. Even though I wish tomorrow I would be saying "I do" in reality I am happy that I still have 68 more days because there is still so much to do! AHHHH!

I know this is another craft but I really haven't had a lot of time to cook this past week.

So almost everything at my wedding is DIY; the center pieces, the wedding arch, the gifts that I am giving my bridesmaids and soon to be mother in-law, the invitations, all the way to the flower girls tutu. Not all of my center pieces will be the same though. Since my dinner and reception will be on an old paddle boat I need to bring in a few tables and ended up using 4 cocktail tables. The the 4 cocktail tables I wanted cake stands with mini pumpkins stacked in the shape of a pyramid. Now cake stands, I found out, are not cheap at all. Yet they are super easy to make and super cheap to DIY.

Sorry for the lack of photos, I am still trying to get the hang of this blogging lifestyle.

What you'll need:
Plates, either white or clear (I picked two different textures)
Epoxy
Candle sticks (or a neat drinking glass)
Spray paint
Primer (only if your plate isn't one color or the color is darker than your spray paint)
Garbage bag/new paper to cover your working area

First pop open your epoxy and try to squeeze even amounts onto a paper plate and mix well, follow directions on the label. Next take your plate and flip it upside down. Then take you candle stick and goop up the epoxy and slather it on the top of the candle stick. The plates I bought have the manufacturer stamp in the middle so I used that as guidance for the placement of the candle stick. Once you have positioned your candle stick place a heavy book on top of it to help give it a hard seal.

The epoxy dries quickly but let them dry over night just to be safe.

Next day check them out, I thought the looked great without the spray paint.


Now that the gluing is finished all you have to do is spray paint them. Take the stands outside in a well ventilated area, I used my garage due to the rain, and place them on an old tarp or something to protect the cement/yard. I started to paint them stem side up first. Since the stems were clear it took a few extra coats to have them perfect. All in all I believe I ended up with 4 coats of spray paint, 5 or 6 on the stems.


Once they are finished enjoy!

** If you plan on using these for food please be advised that placing food on spray paint can be harmful. Please use a doily for cakes and make sure cupcakes have liners 

Wednesday, July 31, 2013

A simple craft for my mother in law's gift

Have you seen those darling necklaces on pinterest that say "Thank you for raising the man of my dreams"? Well I originally wanted to get that for my soon to be mother in law as my gift to her but there is an issue. My soon to be mother in law doesn't really wear jewelry. So why would I get her something that has such a heart felt quote on it just for it to be tossed aside and never seen again.... That is not my style, if I give a gift I put a lot of thought into it hoping that the person will truly love this gift.

So the one thing this women has a lot of and loves are pictures! Why not take that cute saying and transfer it onto a darling picture frame. Then I saw pictures of those stacked frames, where there is a small 4x6 picture frame on a wooden plaque and thought to myself "Eureka! That is perfect!!!"

Well I tried finding DIYs on the stacked frames came up empty handed. So here is my version on how to do this!

What you'll need
  • A large wooden plaque, below is one that is similar to the one I used
  • Spray paint, make sure you can use it on wood, in any color
  • A simple picture frame, I used a 3.5x5, which ever size will fit the plaque along with the wording.
  • Letter stickers, found in the scrap booking section, for this project I only needed two packs (I wanted a little variety and got two different type of letters) 
  • A clear coat top spray, I am using a satin acrylic finish
  • Velcro adhesive


To begin take your plaque outside to a well ventilated area, I used my garage, and place the plaque down on either an old box or a tarp. Then spray paint the wood with which ever beautiful color you picked out, I used cranberry. Make sure you get all the edges really well, I ended up doing a full 3 coats and then had to do a touch up because Mr. Stimpy wanted to add his paw print.


Once the paint has dried cut out the letters you will need for the message, this way you can play with the set up before you stick them. Arrange the placing of the letter to be sure it fits, I had to pull the "Love, Olivia" out due to lack of room.


After you have placed everything in the position you want take a pencil and mark the edges of your frame lightly. Then take your frame back outside with your sealing spray, I used a sating finish acrylic spray. I ended up doing about 4 coats with this spray just be 100% sure the stickers were going to stay on. That satin finish gave everything a very nice matted glimmer, not to shiny but not to dull. You will then take you Velcro and and place two strips on the back of your picture frame.


Now take the opposite Velcro and place along you lines, bring the Velcro in just a tad bit to ensure you won't see it sticking out. I originally used for strips of Velcro but had to take two off. It was very difficult to take the picture frame on and off with four.

Now choose a picture for your frame and stick in on. (I want to put one in here from the wedding so it will be blank until then)


This project was very surprising to me because it was super easy and came out beautiful. The best part was the price, I think it came out to around $13 vs $50-$70 on etsy. You could also use stencils for the wording instead of stickers but I like the 3D texture they give the plaque.

Hope you all enjoy this and come up with some great ideas.

Until next time,
Olivia

Saturday, July 27, 2013

Ribs Ribs Ribs

Yesterday I tried to make ribs for the very first time. I had one of my soon to be sister in-law, her son, my mother, and my fiancé as my taste testers. Well my little nephew in-law ate at least a half slab without leaving a trace behind on the bone but had BBQ sauce all over his face and fingers..... I think they turned out pretty good. I love when I have family over for dinner and my new recipe becomes a hit, unlike my pot roast earlier this year.... oops

Well now lets cut to the chase. I posted a grocery list yesterday but here are you ingredients again;

Ribs
  • 1 Package Back Ribs (side ribs will work but will take longer to cook)
  • 2 Large Onions
  • 4 cloves Garlic, sliced
  • Olive Oil, Salt & Pepper (see note below) OR BBQ Sauce Below (or both!)

  • Rib Rub
  • 1 tablespoon Paprika
  • 1 tablespoon brown sugar
  • 3/4 teaspoon garlic powder
  • 3/4 teaspoon onion powder
  • 1/2 teaspoon black pepper
  • 1/2 teaspoon lemon pepper

  • Instructions


    First take all of your seasonings for you rib run and combine them into one bowl.


    Next take one large onion or two small and cut them up like so


    Not take you ribs out and don't forget to pull that white membrane off of them. Than place onto a foil lined baking sheet and give them a nice massage with  the rib rub. When you place the ribs done make sure the bony side is on the bottom side. Next take your onion and garlic and spread them around onto your ribs.


    Cover your ribs with some foil nice a tight, still allow some breathing room but make sure all corners are sealed. Then put them in the over for 2 hours at 275. Open up the corner and check to make sure they are tender. If the aren't put them back in for another 20 minutes. Mmmmm they will make your house smell so good!


    If you have a charcoal grill like I do about 40 minutes before the ribs are done get that bad boy started, you want your charcoal to be nice a grey.

    Once the ribs are done transfer them outside carefully, your baking sheet will have lots of juice in it. Toss them on the grill and slather them in your favorite sauce, I used a Kansas City BBQ sauce. After about 10 minutes flip them and sauce up the other side.


    Once you have some nice sticky sauce and some charcoal marks they are ready to eat! Make sure you have everything you need before you start eating because these are messy messy messy!!!! (Best way to have them!)


    I served these up with a yummy cucumber salsa, potato salad, and some great grilled corn! Hope you all enjoy!

    Until next time,
    Olivia